EMC TESTING: THE BEGINNER'S GUIDE
Chapter 6 - PreCompliance Testing - Immunity
Immunity compliance testing can be really costly and time consuming at a full compliance lab.
In this chapter of the guide, I'll guide you through some cost effective tools and techniques for immunity pre-compliance testing.
Before you dive into immunity pre-compliance testing, it's important to know what the 'ideal' compliance setup is. That's really what we're trying to achieve with a pre-compliance test setup.
In chapter 3 we covered all of the main EMC immunity tests. If you're rusty on what the tests are or what equipment EMC test labs use for each test, then head over and read that first. The test setups described in chapter 3 are really the 'gold standard' of what you're aiming for with pre-compliance testing.
When you're doing EMC pre-compliance testing, you really want to know whether you're going to pass or fail at a full compliance lab. So the closer the results are with your pre-compliance test equipment to the equipment at a full compliance lab the better.
In this chapter, we'll dig into immunity pre-compliance testing tools and options on different budgets and how the various solutions compare in terms of cost and accuracy.
EMC Immunity Pre-Compliance Testing
Which Immunity Test Setups to Invest In First?
If your company develops lots of variations of one type of product, it's often the case that each variation struggles to pass one specific test. For example a high power switch mode power supply manufacturer may struggle to pass class B conducted emissions. Whereas a high performance graphics card manufacturer may struggle to pass radiated emissions testing.
If that's the case for your company, it makes sense to purchase the equipment to re-create that test in your office so you can verify the performance earlier in the design cycle.
If you don't have that information available, start by investing in perceived high risk areas first.
Often the first dip of the toe into the water of immunity testing is to get an ESD simulator, but read on below for some more ideas.
ESD Pre-Compliance Testing
IEC/EN 61000-4-2
ESD testing is a really common test to fail. It also won't break the bank for most hardware manufacturers to invest in an ESD pre-compliance test setup, so it's often one of the first pieces of EMC test equipment to get.
Here are some options in ascending order of cost.
BBQ Igniter
Cost: $, Accuracy 1/10
At the cheapest end of the spectrum, you can find an extremely cost effective 'ESD generator' in your camping kit.
A simple BBQ igniter is nothing more than a voltage source that can generate several hundred or thousand volts - enough to generate a spark between the igniter and a conductive surface.
The upside of this solution is of course the cost. They are extremely cheap. The downside is that you really have minimal idea of what the peak voltage, how much charge there is or what the source impedance is. You could be several hundreds or thousands of volts (plus or minus) away from the level called out in your applicable test specifications.
So this option really has limited use as a pre-compliance tool. At best, it could be useful for ESD troubleshooting if you're attempting to recreate and fix a failure mode that was discovered using a calibrated ESD simulator.
BBQ Igniter
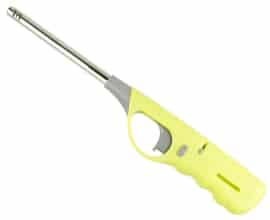
The cheapest ESD Pre-Compliance Tool
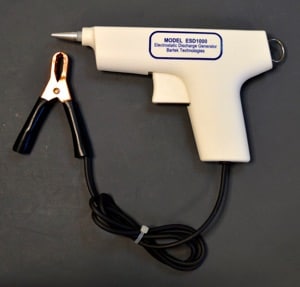
Cheap ESD Generator
Cost: $$, Accuracy: 3/10
A step up from the BBQ igniter method is this 'ESD generator' from Bartek.
Again, this is no match for a calibrated ESD simulator, but it does have a few advantages compared to the BBQ method I just described.
- It has had some qualitative testing performed on the output by the manufacturer, so you have a slightly better idea of the output waveform (Approx +/- 3 to 15 kV, 20ns rise time)
- A ground lead is provided, so the loop impedance is more repeatable
Still, this should really be viewed as a glorified BBQ igniter and only used for ESD troubleshooting and very rough ESD pre-compliance testing.
Make Your Own ESD Simulator
Cost: $$, Accuracy: 5/10
The insides of an ESD simulator aren't rocket science. Here's a diagram from one of the
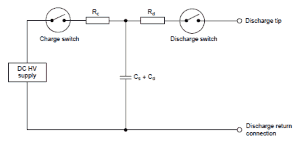
Simplified ESD Simulator
ESD root standards (61000-4-2) that shows a block diagram of an ESD generator.
Essentially all ESD simulators consists of:
- A tuneable high voltage supply (e.g. 500 V-16 kV)
- A resistor/capacitor discharge network
- A switch (must not 'chatter' back and forth when switching on/off)
- A discharge tip (dimensions of these are important. See 61000-4-2 standard for precise measurements for air and contact discharge tips)
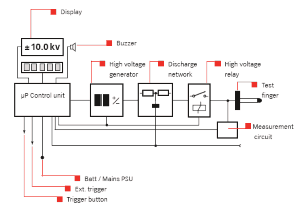
Teseq NSG435 block diagram
Any additional functions/circuitry in an off the shelf ESD simulator are typically related to usability, such as battery, LCD, pulse repetition rate etc.
This diagram on the left for example is taken from the Teseq NSG 435 ESD simulator user manual.
I haven't come across a good app note from an engineer who has created their own accurate ESD simulator yet, but if you have one, please let me know.
Full Compliance ESD Simulator
Cost: $$$, Accuracy: 10/10
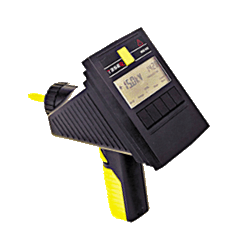 Buying a calibrated ESD simulator can be a really good investment. At current market rates you can expect to pay $3k to $7k USD for used models and $8k+ for new models.
Follow the tips in my "How to find test equipment bargains" post to learn how to secure the best deals.
With your own unit in-house, you can not only avoid paying test lab fees, but you can also de-risk project timelines by testing early prototype units for potential failures.
To get repeatable results, you'll also need to spend a few dollars on a test bench and an indirect discharge metallic panel designed according to the specifications in the 61000-4-2 standard.
Radiated Immunity Pre-Compliance Testing
EN/IEC 61000-4-3
If you're lucky enough to have a full compliance chamber with antennas and RF amplifiers to do radiated immunity pre-compliance testing, then you're set.
For the rest of us without a $100k budget, let's see what's available.
These options are ordered in ascending levels of price and accuracy.
Option 1: Handheld Transmitters
Cost: $$, Accuracy: 2/10
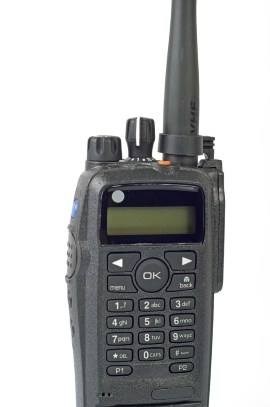 By using devices that intentionally generate RF energy near to your equipment, you can spot check a few frequencies to get an idea of radiated immunity performance. Examples of these include:
- CB Radios (usually 27 MHz)
- FM 2-way radio (~465 MHz)
- Cell phone (~850 MHz/1800 MHz)
At their maximum power output (usually in the order of 500mW - 5W), these should be able to generate field strengths of 3-10 V/m at a distance of 1 meter.
Using a combination of these transmitters, you will be able to subject your product to electric fields at a few spot frequencies.
Limitations
There are lots of downsides to this method of radiated immunity testing. Here are a few:
- Relatively unknown field strength will not give you a good idea of whether you're going to pass or fail at a full compliance lab.
- Limited power output means you won't get much more than 10 V/m which may not meet the strength called out in the standard that applies to your product.
- There may be failure modes in bands in-between these spot frequencies. The chances of the transmit frequencies overlapping with your equipment's problem frequencies are very low.
- Subjecting your product to a field generated only 1 meter away will mean that your device is sat within the near field for at least a portion of the band. This will make the field level even less stable/calibrated.
- Modulation method is different from proper test. Usually 80% AM is required. You won't have the luxury of selecting the modulation scheme on a hand held radio, so it almost definitely won't have the same modulation scheme as required in your immunity standard. This will likely mean you'll get different results than a full compliance test lab, even at the same spot frequencies and same power levels.
Option 2: USB Signal Generator + Near Field Probes
Cost: $$$, Accuracy: 5/10
There are some pretty cool new products that have come out in recent years that will be able to help you to do some radiated immunity pre-compliance testing.
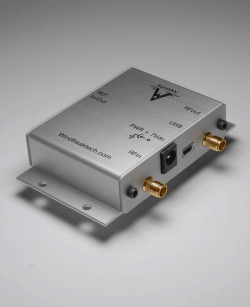
Small, portable USB powered signal generators such as the Windfreak Technologies Synth NV (lots of similar devices available on eBay) come with a little built in amplifier. The can usually cover the whole frequency band of interest (typically 80 MHz - 2.7 GHz) and allow you to modulate the signal with 80% AM, just like a test lab setup.
You can connect the output of this signal generator to either another RF amplifier to get some more gain, or connect directly to passive near field probes.
Using this method, you should be able to generate RF fields across the band of interest with levels of 3-10 V/m. Kenneth Wyatt, an EMC trainer and consultant wrote a good article outlining the test setup in detail here including measurements of the generator field strength levels.
Limitations
- It's entirely possible to generate radiated fields that totally break limits set around the world. Since you'll be sweeping frequencies not just in unlicensed bands, it's very important to be aware that it's illegal to broadcast on many frequencies without a license. Some frequencies are reserved for emergency beacons for instance, so you could inadvertently call emergency services to your office. You could solve this problem by doing the testing in a sealed chamber or faraday cage.
- Again, you'll be operating in the near field for much of the band of interest, so you'll likely get different results from a full compliance lab.
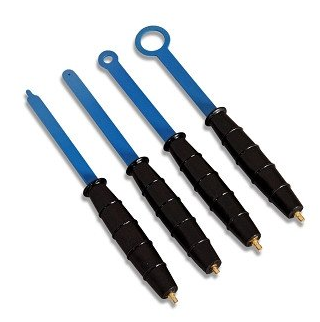
We have low-cost near field probes and RF probe amplifiers for sale in our online store. Click here for more details.
Option 3: Signal Generator + Amplifier + Antenna (Upgrades)
Cost: $$$, Accuracy: 7/10
Compared to 'Option 2' above, there are a few incremental upgrade options, namely the type of signal generator, the strength of the amplifier and the type of transducer.
Signal Generator Upgrade
By investing in a bench-top signal generator as opposed to a small USB generator, you get a few advantages: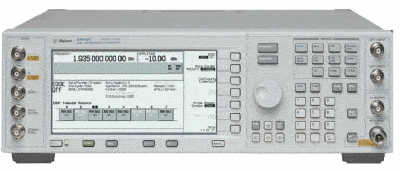
- Better frequency stability, phase noise performance and harmonic amplitude levels. Of these, harmonics amplitudes are probably the most important because you could end up over-testing your product with significant fields generated by harmonics rather than the fundamental.
- GPIB control. If you want to write your own test software to control a test setup, GPIB control is often the way to go. The Windfreak generator does provide open source software, so you could potentially modify it for your application, but other low cost signal generators may not be so kind in terms of giving low level control to your custom application.
Amplifier Upgrade
Another upgrade you could consider is to replace the small amplfier (e.g around 100mW in 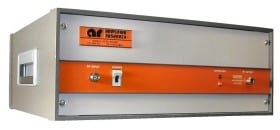 the Windfreak device) with a more powerful external broadband RF power amplifier. By doing that, you could generate much larger field strengths OR generate the same field strength but allow your whole product to be in the far field rather than the near field.
Transducer Upgrade
In the case of 'option 2' above, the 'transducer' is the near field probe. It turns conducted electrical energy into an electric and magnetic field. By changing this transducer, we can alter some field characteristics such as strength and field uniformity. When test labs do full compliance testing in a semi-anechoic chamber, the antenna separation is typically 3 meters or 10 meters. This allows for the equipment under test (EUT) to be full enveloped in a fairly uniform field of a given strength. This is not possible with near field probes - only a small area of your product will be subjected to the required field strength.
Near Field Probes vs. Antennas
You can fix this issue by replacing the near field probes with an antenna. The type of antenna 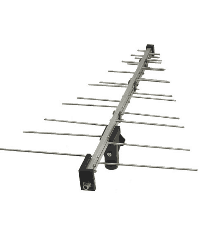 you choose depends on the frequency range.
Typically you'll use a broadband hybrid (biconical/logarithmic hybrid) to cover the range 30 MHz to 2 GHz or so. Higher than that and you'll usually need a horn antenna.
For lower frequencies, get a loop antenna. The problem is that you'll need a lot more juice to drive the antenna at a reasonable separation from the EUT (perhaps 1 meter or 3 meters). Your cheap 100 mW amplifier suddenly may need to become a $10,000 30W broadband RF amplifier.
See chapter 3 for details on antenna selection.
Option 4: Signal Generator + Amplifier + GTEM
Cost: $$$, Accuracy: 8/10
If I wanted to create a radiated immunity pre-compliance test setup for under $1500, this is the method I'd use.
A really nice solution that sits between near field probes and a full compliance test setup is to use a TEM cell or GTEM. 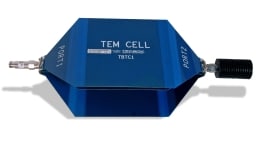 Your Windfreak signal generator can potentially drive a TEM cell directly without needing a separate amplifier.
For example, Tekbox offer 3 different open TEM cells.
The table below shows the required input power levels to generate a given field strength in their smallest model.
As you can see, a 20 dBm amp (around the Windfreak maximum power levels) can generate up to 44 V/m in the TEM - quite a high field strength for many products.
Don't know what field strength your product will be subjected to at a lab? Look at your old test reports, ask a lab, or learn how to create your own test plan.
The larger the TEM, the more juice you'll need to produce a given field strength but the larger the products are that you can test.
The main benefit of a TEM over using near field probes is that the field is reasonably uniform over your whole product.
Also, larger GTEMs are fully enclosed and therefore you don't need to worry about illegally broadcasting across restricted bands.
Click here to see our stock of TEM cells.
Accessories
Shielded rooms/tents
WARNING: The FCC (and potentially equivalent regulatory bodies around the world) can issue fines and have the power to imprison you if you're found to be illegally transmitting RF energy. Pumping RF power, even in the mW range, into near field probes, antennas and open TEM cells will most likely exceed the limits for emissions.
To minimize the risk of getting fined, you can use things like:
- RF shielded 'tents'
- RF shielded enclosures
- Shielded rooms
- Semi-anechoic chambers
- Enclosed GTEM cells
Check out the "Anechoic Chamber Guide for Emissions, Immunity and RF Testing" for more info.
Isotropic field probes
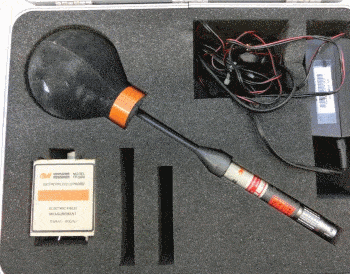 If you want to verify the field strength that your near field probes, antennas or GTEM are generating, you'll need an isotropic field probe.
GPIB readable models are available (although expensive). Cheaper models are available on ebay, but make sure the frequency range and accuracy are adequate for your application.
Automation software
Radiated immunity testing involves sweeping through a band of frequencies.
Because antenna/probe/TEM gain and amplifier gain vary across a given frequency band, every frequency point needs to have a corresponding signal generator gain setting. In that way, your test setup can maintain a fixed and stable field strength from the lowest frequency to the highest frequency of interest.
Using an isotropic field probe (described above), you can (manually or automatically depending on your probe) tune your signal generator to the levels required to maintain the required field strength across the band of interest. This table of frequency vs. signal generator gain is then stored and played back in the future to generate the same sweep.
Some options for radiated immunity automation software are:
- Write your own in labview (Control signal generator via GPIB or USB)
- Get EMC Ware from Amplifier Research (free at time of writing)
Electrical Fast Transient (EFT) Pre-Compliance Testing
IEC/EN61000-4-4
The challenge with EFT pre-compliance testing without a fully compliant test generator is how can you accurately re-create the precisely timed transient waveforms?
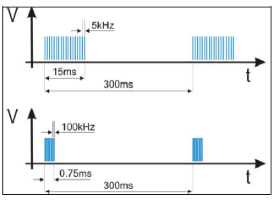
Typical EFT Burst Sequence
The 'spikes' need to be in the order of several kV in amplitude, but only microseconds in duration and are applied through a carefully defined source impedance which is called out in the applicable standards.
Presumably a fully compliant test generator produces these waveforms in a similar way to an ESD simulator in that there is a tuneable high voltage source which charges a storage capacitor. Discharges are controlled with carefully timed relays.
The capacitors need to be capable not only of withstanding high voltages, but also high discharge currents of tens or in some cases hundreds of Amps for very short periods of time.
I learned recently through refurbishing a couple of my CE Master combination immunity test generators that these caps are expensive (hundreds of dollars) and are referred to as 'pulse capacitors'.
But, there are a couple of options that you could look into if you wanted to re-create this test on a budget.
Option 1: ESD Simulator into Cabling
Cost: $, Accuracy: 3/10
An ESD simulator produces similar waveforms to EFT, albeit not as quickly.
But what you can do is discharge the ESD pulse into one end of a cable (with the other end connected to ground) and tape that cable to your signal and power cables (one at a time).
The ESD pulse will cause a high current to momentarily flow down the cable and that's going to produce a magnetic field. Through inductive and capacitive coupling, the fields will induce a current in the signal and power cables of your product, mimicking the behaviour of a capacitive coupling clamp in a full compliance test setup.
Option 2: 'Chattering' Relay
This is kind of neat option if you can make or get your hands on a high voltage DC power supply.
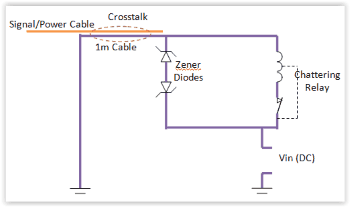
Simple Chattering Relay Circuit
Similar to the ESD option above, you can tape a cable carrying the 'disturbance' to signal and power cables. Instead of injecting a signal using an ESD simulator, you can supply a DC voltage and allow a relay to chatter ON and OFF by including protection diodes (back to back Zener diodes as shown).
You'll need to buy different diodes to test with different breakdown voltages and these will limit the maximum voltage injected onto the cable.
Due to the back EMF generated inductively when the relay turns off (according to V=-L(dI/dt)), the transient voltage can be tens or hundreds of times larger than the DC power supply you provided.
The trick will be to choose (through trial and error) the diodes with the right breakdown voltages to correspond roughly to the required EFT waveform specifications.
Option 3: Used EFT Generator
Cost: $$, Accuracy: 8/10
A really good option to consider is to keep an eye on eBay for used test generators. Fairly regularly you'll find used EFT burst generators selling for a couple of thousand dollars upwards.
Standards change from time to time and occasionally this will mean that old test generators are no longer fully compliant with the rules. They may be fully functional, but don't strictly meet some timing or voltage parameters. If you're willing to deal with a little less than perfect waveforms, this can be a great way to secure in-house EFT pre-compliance capabilities.
The main things to watch out for are:
- If the unit is sold 'as-is', expect that the storage caps could potentially need replacing. Consider asking the seller to send directly to a calibration lab for verification before purchasing. Alternatively verify at your office using HV probes on an oscilloscope.
- You will need to purchase a separate capacitive clamp (see below) for testing signal cables.
- Verify that the repition rate and voltage levels the generator produces is acceptably close to that called out in the standard that applies to your product.
Accessories
Capacitive Clamp
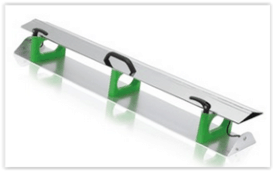 A capacitive clamp is one of the main ways to inject the disturbance signal into your signal cables (as opposed to your power cable where the disturbance is injected conductively within the test generator).
These are few and far between on the used market, but if you're determined to save a few dollars, consider making your own.
The 61000-4-4 standard (download link provided in chapter 3) provides the specification for this simple mechanical device.
Alternatively taping the disturbance cable to the signal cable as I described above will do a similar, albeit less calibrated job.
Surge EMC Pre-Compliance Testing
EN/IEC 61000-4-5
Surge testing involves pretty large voltages and currents (kV and hundreds of Amps for a period of tens or hundreds of milliseconds).
Plenty enough to kill you if it happens to pass through the wrong part of your body.
For this reason I can't really recommend trying to hack together your own pre-compliance test setup.
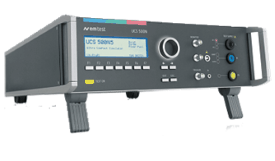 If you see surge testing as a risk area for your product, which it is for lots and lots of products, I'd recommend buying either:
- A new/used combination immunity test generator. These can typically cover several tests including EFT, surge, dips/drops/interruptions, magnetic field, ringwave oscillations etc. Sometimes you'll find combination generators that have only one or two modules installed but could be expanded in the future. Some manufacturers include: Thermo-Fischer, Haefely and EM Test.
- A new/used surge generator. These are standalone units that cover only one test.
The good thing about these options are that when they're properly grounded, you're unlikely to have a unscheduled hospital visit.
Conducted Immunity Pre-Compliance Testing
EN/IEC 61000-4-6
Again, this test is a real challenge to make a lower cost test setup.
The main reason being that a powerful broadband RF amplifier in the order of tens of Watts is required to generate typical test levels of 3 Vrms or 10 Vrms across typical frequency ranges of 150 kHz to >200 MHz.
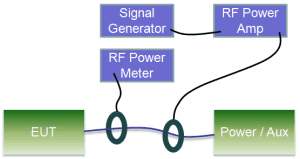 Essentially you're going to need:
- A signal generator
- An amplifier
- A transducer (CDN, BCI probe or EM clamp)
- A calibration jig (optional)
Some publications I've read recommend things like the chattering relay method again or bringing licensed high power transmitters like CB radios into close proximity to your cables to inject a modulated signal in.
But in reality these will yield practically no information as to how your product will perform during final compliance testing. Accredited test labs even have repeatability issues with this test because different injection transducers are often considered to be equally valid whilst their behaviour is completely different (e.g. a CDN vs. a BCI probe).
Magnetic Field EMC Pre-Compliance Testing
EN/IEC 61000-4-8
First thing to note here is that there are at least two variations to this test:
- Power-line magnetic field testing (i.e. at 50/60 Hz)
- Swept frequency magnetic field testing (e.g. 50 Hz to 10 kHz)
Power-Line Magnetic Field
The first is a lot easier to re-create, the second, not so much.
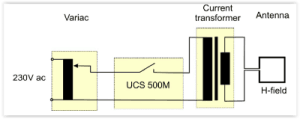 If you recall back to chapter 3, a typical magnetic field test setup looks like this.
In this case, the combination immunity test machine isn't doing a whole lot other than switching the current on and off to the transformer.
It's also controlling the variac tap, but you can also do that manually with whatever variac you can get your hands on.
So here's a list of what you'll need to create this test setup for pre-compliance testing:
- Variac (make sure it's sized to carry enough current to drive the antenna)
- Current transformer
- Loop antenna
To construct the loop antenna, you can use easy to find materials like wood and PVC piping. Follow the instructions here.
To calculate the required current to generate a magnetic field strength defined in your standard keep in mind that for a 1 meter diameter single loop, the field in the middle will equal the loop current (Bio-Savart Law). So with 1 loop, the field will be 1 A/m. With 2 loops, the field will be 2 A/m.
For a square loop, you'll need to use a correction factor which reduces the magnetic field by approximately 10%.
Swept Frequency Magnetic Field Testing
The swept frequency magnetic field test, called out in certain circumstances in some standards (such as professional audio equipment), you'll need some different equipment:
- Signal generator (covering a frequency range e.g. 50 Hz to 10 kHz)
- Audio amplifier (not-coincidentally audio amps cover the frequency range of interest)
- Loop antenna (see details above)
Get full details on how to make this test setup here.
Voltage Dips, Drops and Interruptions Pre-Compliance Testing
EN/IEC 61000-4-11(AC)/-29(DC)
The main issues with creating a simple pre-compliance version of this test are:
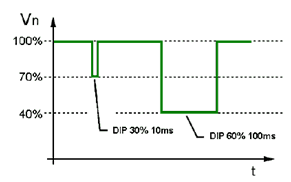 How do you dip the AC or DC voltage by a given percentage? (e.g. 40% and 70%)
- How do you dip the voltage for a specific period of time? (e.g. 20ms, 100ms)
- How do you synchronize the dips to start and finish at specific phases of the AC power waveform?
Function (1) above is typically taken care of by a manual OR automatically controlled variac (also known as variable auto-transformers).
Functions (2) and (3) are typically taken care of by a combination immunity test generator such as the UCS500N5 from EM Test.
Variacs are widely available of course, which leaves functions 2 and 3 to take care of.
Depending on how much your time is worth, it could be worth your while making a timed relay circuit to switch between the two required voltage levels (100% and the dipped value) rather than purchase a fully compliant immunity test generator.
I haven't personally done this, but I don't see why you couldn't do it fairly easily with a small micro or even a 555 timer.
Another option is to just dial down the voltage on your bench top power supply.
The main scenario you're trying to avoid is unexpected or unrecoverable product behaviour during a power brownout event.
So even if you don't have the equipment to perform this test, here are a few suggestions for mitigation:
- Ensure you have a simple power brownout detector and watchdog timer in your design.
- Ensure your product software/firmware recovers to a usable state after a brownout. Ideally the user would not have to interact with the product for it to recover to the same state as before the brownout (criteria A pass).
- Flick the power supply on and off to your unit several times at high speed to see if you can get the product to behave erratically. If it does, figure out why and fix it before final testing.
Conclusions
Armed with this knowledge, I hope you go forth and begin to invest in some EMC pre-compliance test equipment, it might just save you from debugging EMC problems over the weekend!
That's it for the first part of the beginner's guide to EMC. Remember to share this with any friends or colleagues that will find it valuable. Also leave any comments or questions below!



Comments 2
As always, thank you Andy, and great read. I may try one of those USB RF Signal Generators for quick troubleshooting. For the price, +19dBm output power is not bad. I saw that bench top open TEM cell from Tekbox, which is quite a unique product for pre-compliance. I bought a set of their probes. No complaints yet.
Author
Thanks Nick. I approached Tekbox to distribute their products because I think they’re great and we have an agreement now. So if you’d like you can buy through me. In the new webstore I’ll be doing lots of video how-to’s, reviews, comparisons and tutorials on equipment like this. I’m offering free enrollment to one of my online courses as a bonus right now (some conditions will apply) if interested.